I decided that I wanted to upgrade the storage in my MacBook Pro that’s about seven years old now from a spinning hard drive to solid-state storage. The computer came with a 750 GB hard drive and it was getting pretty full too.
SSDs come in pretty standard power-of-two sizes like 128 GB, 256 GB, 512 GB, etc. So you really can’t get a 750 GB SSD and since I was running out of space anyway I wanted to get a bigger one so I settled on a 1 TB SSD.
I ordered a Samsung 860 EVO drive from Amazon, picked the slow, free shipping but still got it in less than 24 hours of placing my order.
After the SSD arrived I removed the hard drive from the MacBook Pro and made a sector-by-sector image of it using a Linux system that I have around. I then took my sector-by-sector image and applied it to the new SSD.
Since the hard drive was 750 GB, I had 750 GB copied to the 1 TB SSD including the partition tables that indicated that the partitions totaled 750 GB. That means 250 GB of the 1 TB SSD is now unused and cannot currently be accessed. I anticipated this because I’ve done this many times for clients and I’m pretty familiar with how the partitions are laid out on a disk from previous professional experience.
Built in to OS X is Disk Utility, which handles managing the partitions on a disk. So when I put the new SSD in to the laptop I started in Recovery Mode, which allows you to run some limited things like reinstalling Mac OS X and running Disk Utility. So I start Disk Utility and it correctly shows the disk as 1 TB with a 750 GB partition and 250 GB unused. There was a small circle that looked like it could be grabbed to pull the existing partition to expand in to the unused 250 GB space but it simply wouldn’t let me. The same operation can be done from the command line but it would just generate an error.
Searching the Internet I came across this post on Stack Exchange. It got marked as a duplicate of another question and closed but the question it’s linked to isn’t really the same as this one (people on Stack Exchange and Stack Overflow are pretty quick to close questions as duplicates of another even though that’s not always the case). The comment added by “Dannie P” is actually the answer to the problem and involves the following:
gparted will show a dialog box stating that the GPT doesn’t describe the entire disk and that it can fix that. Allow gparted to fix it.
Create a partition in the unused space. This probably isn’t necessary once the GPT has been fixed but I did it anyway.
Return to Disk Utility in OS X and delete the partition created in Step 3.
Since I was using APFS, it automatically expanded the APFS volume to encompass the space the partition in Step 3 was using and now the entire drive is being used by the primary APFS volume.
Fixing the GPT (Global Partition Table) should be something that Disk Utility should be able to handle but obviously it isn’t set up to do that.
We did our summer vacation to California in two parts. The first was to LEGOLAND and the second was just to spend time on the beach and just relax.
LEGOLAND California (June 24, 2018-June 27, 2018)
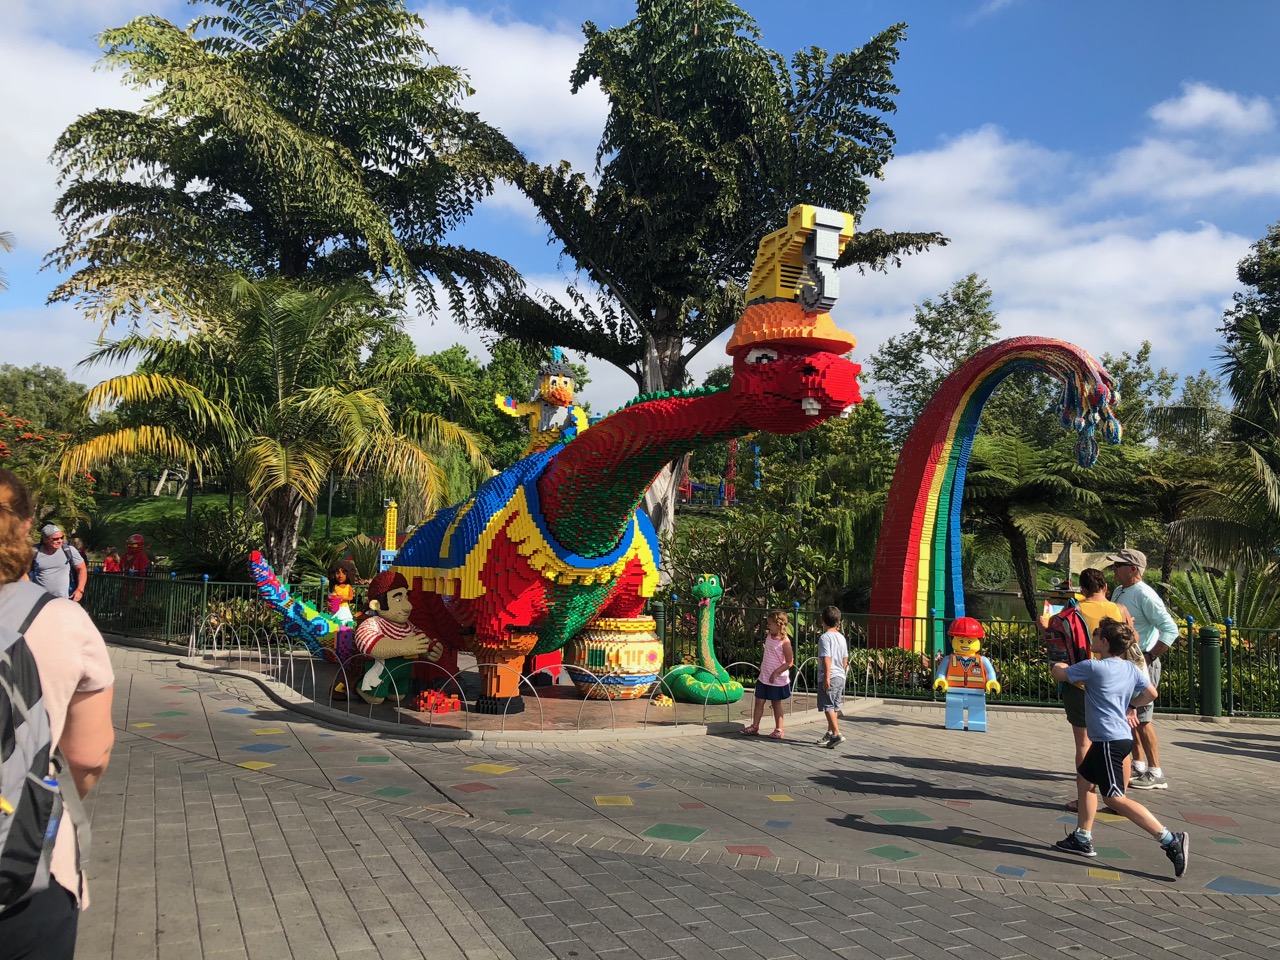
Our first stop was LEGOLAND California. We stayed in the LEGOLAND Hotel that’s right on the property. They had just opened a new hotel there that looks like a castle but we opted to stay in the original hotel.
I joked with Matthew and Lorelei saying that the hotel had better be made out of Legos or we weren’t staying there. The hotel is painted to look like it’s made out of Legos with brightly-colored sections but, of course, it’s not made out of Legos. However, they do have Lego sculptures throughout the hotel that are made out of the bricks including a dragon that greeted us at the entrance.
We arrived at the hotel right around check-in time but there were already several people in line waiting. Of course, after about six hours of driving Matthew and Lorelei were pretty anxious to explore and play not sit some more. Fortunately the hotel has a big Lego pit in the lobby for kids to play in. In addition there is a scavenger hunt for them to do where the answers they get are used to unlock a “treasure chest” that’s in the room. The kids went off and did the scavenger hunt while I waited in line to check-in.
Once it was my turn I was told that the room wasn’t ready yet (which was disappointing since we were there after the designated check-in time) but that they would send me a text message when it was. By the time it was my turn to check-in the kids had already finished the scavenger hunt so we sat in the lobby waiting for a text message. After waiting an hour with no text message I went up to the reception desk again to see what was going on only to find out that our room was finally ready.
We made our way to the elevator only to come upon one of the most popular attractions of the hotel: the corner with the whoopee cushion built in to the floor. It’s clearly marked on the carpet to avoid embarrassing anyone and you have to go out of your way to trigger it. It’s basically a pressure sensor under the carpet hooked up to a speaker in the wall. Of course it makes all kinds of different fart noises along with some interspersed commentary from the lego character painted on the wall. Every time we went to the elevator someone was stomping on that thing.
When making the reservation I picked the “adventure” themed room. They also have Ninjago (which I guess was a movie or cartoon series but I have never heard of it before), princess, medieval and adolescent girl themes. The adventure themed room was decorated like an Indiana Jones movie. Keeping with the Lego theme, there were several lego models in the room: we had a bug on the bathroom door, a parrot looking over the bedroom and a scorpion in the bathroom. A sign in the room says that the Lego models are not to be removed from the room or you could be charged up to $900 to replace them if they were taken or damaged in some way.
Inside the room is the “treasure chest” that has a combination lock on it. The combination is four-digit answer they got from the scavenger hunt around the lobby of the hotel. The kids must have gotten the correct answer because the treasure chest did open and there were bags of Lego kits inside.
The room is laid out well for kids staying with their parents. The kids had their own section of the room for sleeping with bunk beds (with their own controllable lights) and their own television. The adult bed was just like any other hotel bed.
Our room was on the third floor and overlooked the main entrance to the theme park.
There was a refrigerator in the room and we typically make use of such things because we like to bring our own drinks and water bottles. However the refrigerator seemed like it was just a couple of degrees blow the room temperature. I notified the front desk and they sent someone to look at it pretty quickly but the technician said that the refrigerator is operating as expected. They did offer to bring up a bigger refrigerator, which I accepted and it did cool much better. I was pleasantly surprised that they didn’t tack on an additional fee for the refrigerator for the duration of our stay.
There are a couple of restaurants right in the original hotel (we didn’t wander over to the castle hotel to see what restaurants they offered). One was buffet style (Bricks Family Restaurant) and the other was traditional sit-down style. We tried the buffet place for dinner the first night and were kind of shocked at the nearly $100 bill (with gratuity) for the four of us. Since it was buffet it was all-you-can-eat but it’s enough of a challenge getting Matthew and Lorelei to eat new things that they weren’t really excited about anything the buffet offered. So we didn’t go back there for dinner the rest of our stay. Breakfast was free there every morning though.
As hotel guests we got 30-minute early access to some portions of the park and we took advantage of that in the two full days that we were there. Our strategy was to use the LEGOLAND mobile application to figure out the ride wait times to figure out which ones ended up with the longest wait times and go to those when they were open for hotel guests only.
So the very first ride we went to was Coastersaurus, a small roller coaster. Matthew and Lorelei weren’t big fans. It wasn’t a crazy roller coaster. It didn’t go very fast or go upside down but just when they thought the ride was over the operator let it do it again (maybe because it was early in the morning with a pretty small line because it wasn’t open to the general public yet). Needless to say we didn’t return to that ride.
One of the kids’ favorite rides was the Driving School. They got to drive their own electric cars on a mock-up of city streets complete with roads with painted lane lines and street lights. Both Matthew and Lorelei did pretty well with that. Many kids ended up in mini-pileups that the ride operators had to untangle but Matthew and Lorelei stayed away from those. Matthew did try to run another kid off the road but it was mostly the other kid’s fault.
Of course it being LEGOLAND meant that there were numerous models made out of Legos and all of them were quite impressive. There were Lego representations of San Francisco, Las Vegas, Washington, D.C., New Orleans, London, India and many other places. They also had many different Star Wars Lego models. I was debating if they were solid Legos or if they were a Lego facade built around some kind of interior structure. On a boat ride that went around to some of the larger structures the tour guide was giving counts of how many Legos each model was and they were all around 100,000 so that pretty much implies that they are solid Legos. All of the models were very impressive and detailed.
There’s also a waterpark there. We spent about half a day there but you could easily spend at least an entire day in there alone. The kids really liked the large wave pool they had. Matthew really liked the lazy river because he made me go around with him about eight times. Karen and I both went down a waterslide with each of the kids.
There are lots of little stores around the park (I’ll leave it to the reader’s imagination as to what they sell). One of the nice things is that they all seemed to have bins with Legos in them that the kids were free to build with while you were in the store.
We spent two full days at LEGOLAND and felt like we did everything there was to see. We certainly didn’t do all of the rides (there were other rollercoasters that we absolutely knew that Matthew and Lorelei wouldn’t do after the Coastersaurus ride).
I don’t think LEGOLAND has the age reach of other theme parks like Disneyland. Probably once the kids hit 10 years old, LEGOLAND will lose its appeal to them but at least at their current age they definitely want to go back again someday.
Shelter Island, San Diego, California (June 27, 2018-June 30, 2018)
After LEGOLAND we drove a few miles to Shelter Island to just relax and find some beaches as Matthew and Lorelei had never seen the ocean before.
Before getting to Shelter Island, we drove to the coast so that Matthew and Lorelei can experience the ocean for the first time. La Jolla is where we decided to stop. La Jolla is a very popular place with popular beaches and so finding parking was a challenge
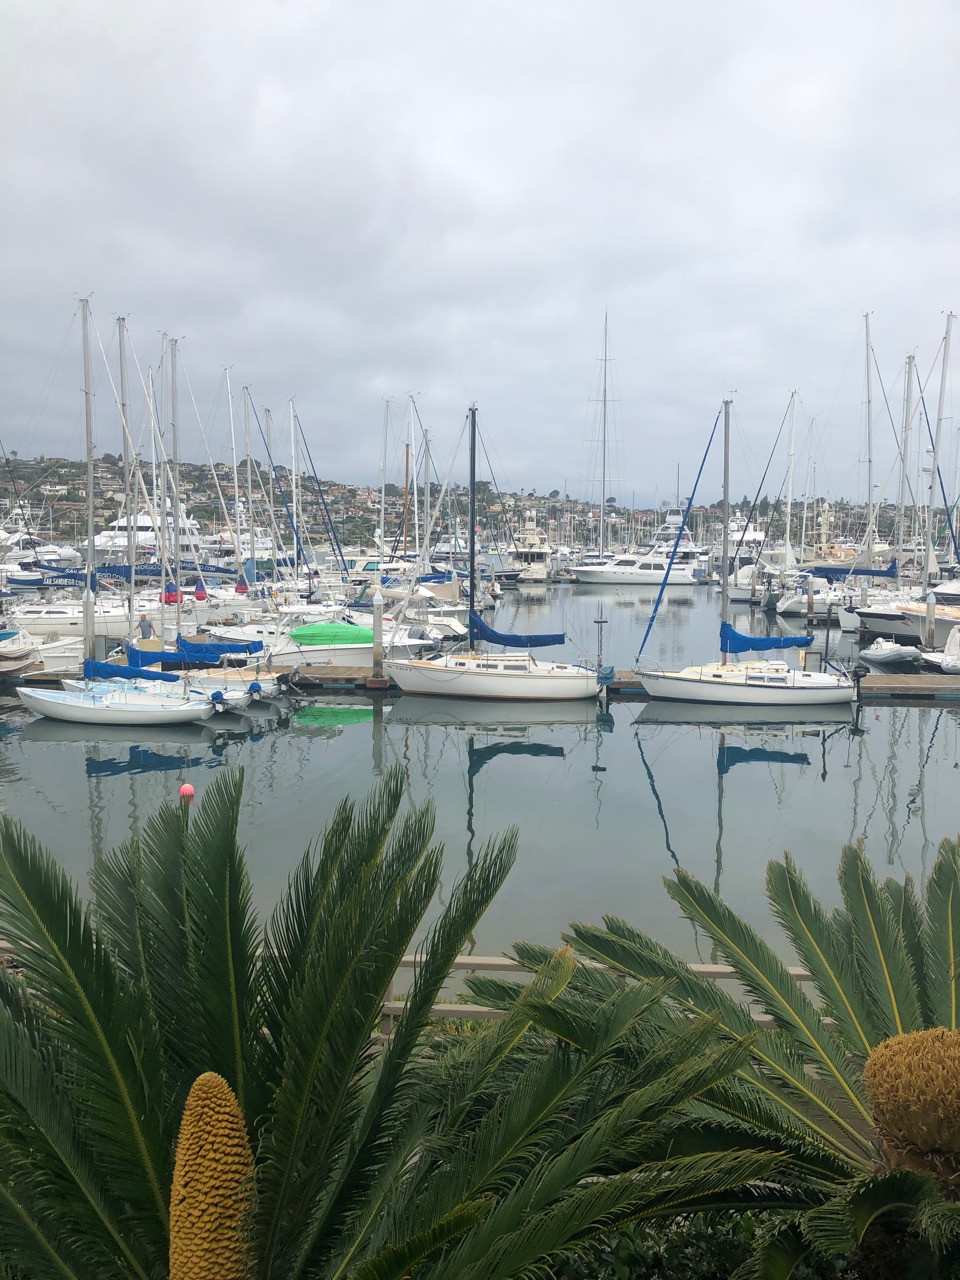
We stayed at the Best Western Island Palms Hotel & Marina. I opted for the marina view room. I read somewhere that the Shelter Island Marina was a deep-water marina making it one of the few places where really large yachts can moor.
The view from our room at the Island Palms Hotel & Marina.
Shelter Island was nice because it had its own little beach and a playground within walking distance of the hotel. Shelter Island isn’t that big so it’s easy to walk the entire island from end to end. It’s only a few hundred feet wide and maybe a mile long. The island consists of mainly hotels and resorts. Most of the hotel/resorts had their own marinas (ours included) but all of them had a keypad so people can’t just wander out on the docks among the yachts.
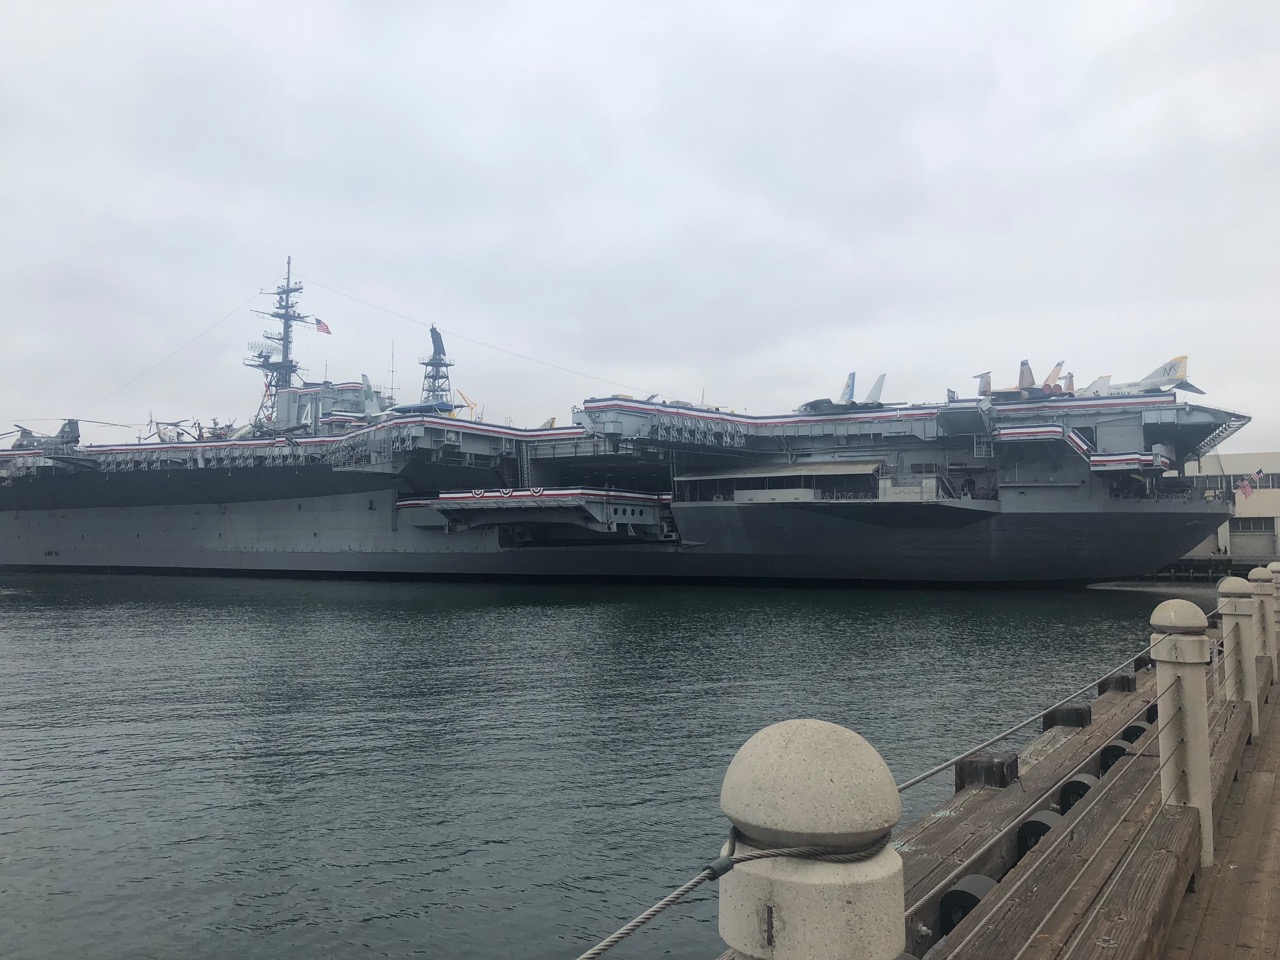
This part of our vacation wasn’t as hectic as LEGOLAND. We didn’t really have any set schedule of things we had to do. One of the things I always wanted to see in San Diego was the USS Midway Museum since Karen and I were in San Diego back in 2008.
Port-side view of the USS Midway Museum
We showed up only about an hour before the USS Midway Museum closed one day. The person at the ticket window said that one hour isn’t sufficient to tour the entire aircraft carrier but that we could still purchase the tickets that day, wander around the museum for an hour and then come back the next day at no charge. With our hour we mostly wandered around the flight deck and the hangar below and looked at the numerous aircraft they have on display (mostly Vietnam War and Korean War era aircraft).
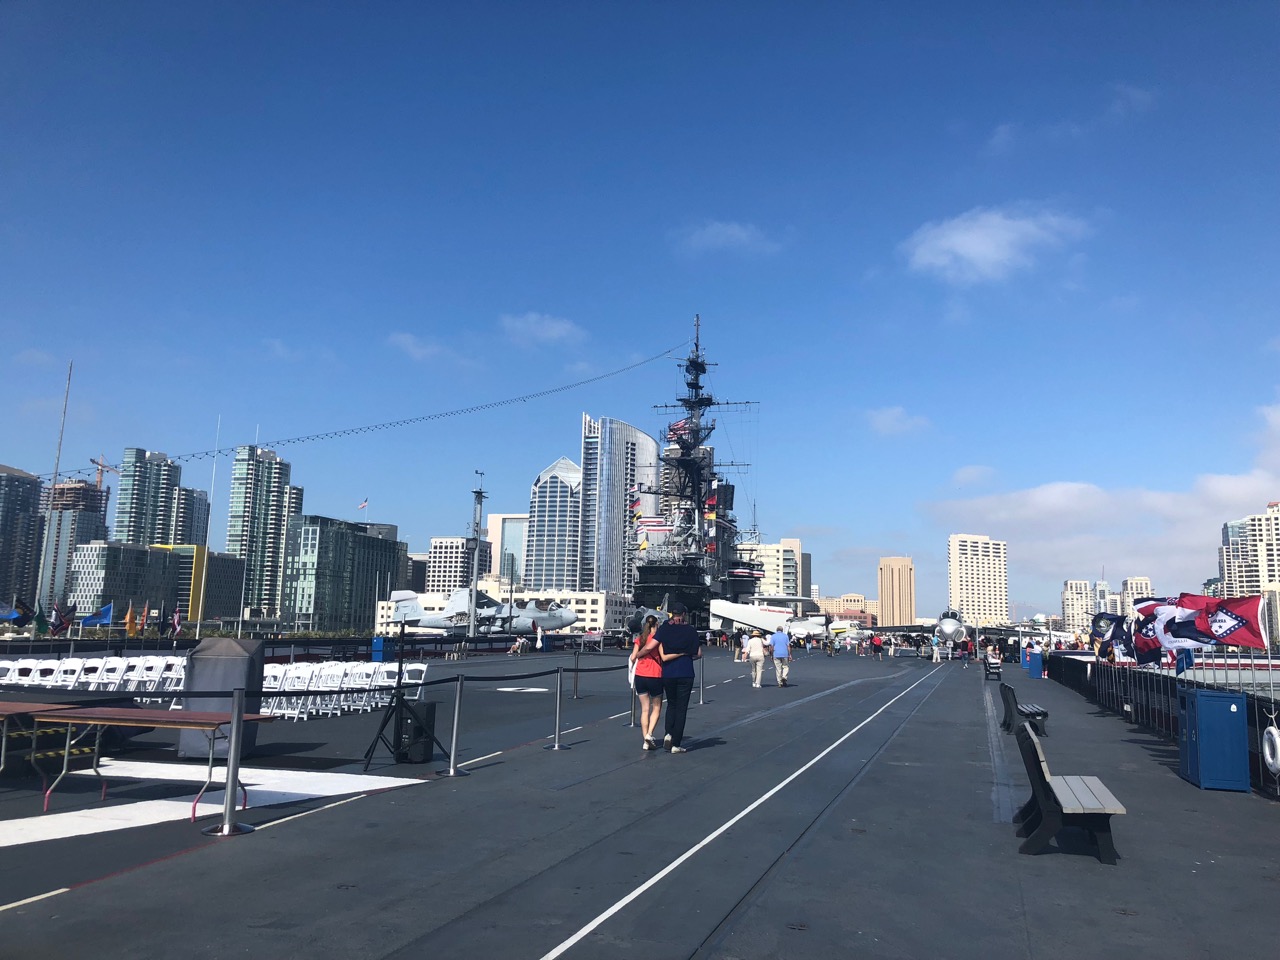
Looking aft on the flight deck of the USS Midway Museum with the bridge in the background
The next day we went back and did the full self-guided tour. Depending on how long you take in the individual compartments, the self-guided tour can take up to three hours. We went through sleeping quarters for both the enlisted personnel as well as the officers’ quarters/mess, the mess area/kitchen, communications/control (Matthew really liked this area because you could push the buttons on the equipment as well as them having a window in the floor showing all of the wiring running around), ready rooms for both aircraft and helicopters, brig, engine room and the forecastle (that’s where they keep the really big anchors attached to really big chains to hold them). There was also a tour of the bridge but it was a guided tour because of the limited space and there probably would have been a wait. It would have been interesting to see though.
Another day we went to Balboa Park. We didn’t really visit many of the buildings but we did visit the Botanical Building and Lily Pond. We just walked around the park after that. They have an extensive collection of different varieties of roses.
After our time at Shelter Island we headed back home. San Diego is only about a six-hour drive from our home so not too long of a drive after spending about a week in San Diego.
I have been teaching myself Apple’s new Swift programming language since it came out a while ago. I’ve mostly been interested in it to learn OS X programming more than iOS programming but it would apply to either.
I started with just a simple idea of a command-line tool as a toy project for it because it would be quick to get it running without having to design a complicated GUI to make it all work.
Also, in the interests of code-reuse, one component of it would be built as a Swift framework so that it could be used in other projects.
Being that Swift is a brand new language, it is still under heavy development by Apple. That means they have to make it so that elements of the language and run-time can be easily changed without breaking any of the current code that’s out there.
I wrote my framework (which would be analogous to a library or DLL in other operating systems) and got it to build. I brought the framework in to my Swift command-line tool and got everything to build there.
I go to run the command-line tool from Terminal and the loader says that it can’t find my framework, which it needs to run. In normal applications (that have a GUI), any needed frameworks are embedded in the application itself but that can’t be done with a command-line tool so I have to somehow tell the loader where to find my framework. I didn’t want to install my framework in the system-wide frameworks because this is just a toy project. So I made my own Frameworks directory and then used the DYLD_FRAMEWORK_PATH environment variable to point to that directory and then ran the executable again after copying my framework in there. Now the loader says that it can’t find the Swift run-time library in my framework.
This is where my previous mention of Swift being a new language comes in. Normally run-time libraries are included with the OS and they are found automatically by the loader when it tries to run an executable. Since Swift and its associated run-time library are so new and subject to change, when you build an executable the run-time library is embedded in the executable itself. I noticed that the size of my simple command-line application was in the megabytes and thought that was really high for how much code it contained but the fact that the run-time library is embedded in there makes that size a lot more reasonable. The problem is that a framework isn’t considered an executable so the compiler won’t embed the Swift run-time library in there. So when the main executable is run the loader wants the framework to have access to the Swift run-time library as well even though the main executable does have it already.
The way to fix this is to go in to the framework’s project settings and enable the option that says that the framework has embedded Swift code. This forces the compiler to embed the Swift run-time library in the framework. Rebuild the framework and then rebuild the main application. Now the problem is that both the framework and the main application both have the Swift run-time library embedded in them. So when the main application is run, a bunch of warnings will appear saying that multiple copies of methods in the Swift run-time library were found and which one is used is not defined. This isn’t a big deal for my toy project because both embedded Swift run-time libraries are the same and my application runs! The problem will be when something changes in the Swift run-time library and I’ll need to make sure to rebuild both my framework and the main application again or I’m likely to get some strange (and hard to debug behavior).
I hope that once Swift gets a little more mature that this issue will go away. Embedding the run-time library in every executable doesn’t seem like a good long-term solution (and is a waste of space).
This past week Harley-Davidson brought their new concept, fully electric, motorcycle currently called Project LiveWire by the Intel campus to show off. They were also signing people for demo rides at Harley-Davidson of Chandler so I signed-up.
At the dealership there was a tractor tailer that was the tour vehicle going around the country that opened up in to its own display booth. This is where you had to watch the introductory video telling you that Project LiveWire is not like other motorcycles (there is no clutch and no gear-shift) and sign the requisite liability waiver forms.
Then you got on one of eight bikes that were there. There’s just one variant so they were all the same.
The stated range of the bike is currently 50 miles and it weighs about 400 pounds. There is only room for the rider (no passenger at this point). These being prototypes that is all subject to change before the bike is actually made available for sale.
Sitting on the bike in riding position I was in more of a forward leaning position. Not quite like a sport bike where you are hugging the bike for aerodynamics but also not fully upright in a neutral position. I guess with a 50-mile range you’re not going to go on some long trip with this and they probably want the bike to look more aggressive than their other models.
Instead of a traditional instrument cluster, there is a single touch-screen display. Of course, it tells you your speed but you also get other electric-vehicle information like battery voltage, battery temperature, ECU temperature, how much of the bike’s power capacity you are using at any moment, what seemed to be an inaccurate compass heading and how much range is left. I would have like to have more time to play with it and get the feel of the bike’s other controls but I think they were running behind schedule due to a brief rain shower that happened just before I arrived for my test ride.
We were then told to press the start button and the bike came to life. The bike isn’t ready to move at this point. I guess just briefly pressing the start button puts it in “accessory mode” like a car. The display then had a big “111” in the screen. They guy giving the overview said that indicates that the bike is in this accessory mode and that the engine is not engaged. I thought I heard him say the 111 signified the age of the Harley-Davidson company. That’s nice and nostalgic and all but does it change as the company gets older? I thought it would be more intuitive if it just had a big N for neutral to indicate that the bike’s motor was not engaged.
Holding the start button actually engages the electric motor. With no clutch or gear-shift turning the throttle now yields the bike moving. So now it was time to actually ride this thing. You can pick between two riding modes: range and power. I stuck to range for this ride so that I wouldn’t have any surprises.
As with all other electric motor vehicles, there is plenty of torque available at any time. I was at the end of the group so I was the last to turn out of the dealership on to Chandler Boulevard. The light holding the traffic had just turned green so I had to hustle to catch up to the rest of the ride and to not get in the way of the traffic that was now coming down the street towards me. That was no problem on this bike. The next thing I knew I had the bike going 55. Also with other electric vehicles, they use coasting and braking to put power back in to the battery pack. It’s really noticeable slow-down when you roll-off the throttle on this bike. There really isn’t any coasting. In fact, I don’t think I had to use the brakes at all during the demo ride to slow down. They warned us during the briefing that you should still tap the brakes so that the person behind knows that the bike in front is slowing down.
The route for the demo ride was just four right turns to keep things simple and not split up the group. This is where I wish I had a little more time to get accustomed to the controls. Harley’s have a turn signal controller on each handlebar: the left one on the left grip and the right one on the right grip. Every other bike I’ve ridden the left and right turn signal are both on the left grip. So I kept trying to push one side of the turn signal on the left grip to indicate a right turn. I’m pretty sure I had my left turn signal on most of the ride. It wasn’t until I got back to the dealership that I realized that Harley splits the turn signals. If you can’t tell, I’ve never ridden a Harley before.
The bike has an electric motor so there isn’t the loud rumble of Harley’s other bikes. The LiveWire does sound like the light bikes from the movie Tron when accelerating.
Overall it was a fun ride but I probably wouldn’t buy one. I wish I could have had a little more time with it. The bike felt heavy sitting there but once moving it really wasn’t that hard to maneuver. I didn’t really like the slightly-forward riding position. I’m more of a neutral position, dual sport kind of rider. I’m not sure how well it would sell given Harley’s current demographics. I can’t see any traditional Harley enthusiasts buying one of these but they may be targeting a different kind of rider with this bike. These were all prototype, hand-built bikes but felt very solid. The torque was mesmerizing but I really didn’t like the coasting response, it felt to abrupt to me.